Filipino freelancers are remote workers. More often than not, they work with clients abroad or far from home. Although distance and communication are not really an issue for some clients, many employers still prefer to work with credible and accredited freelancers. We have seen this demand first hand at Rakuboss.
That’s why we highly encourage all Filipino freelancers to acquire a Certificate of Registration (CoR) from the Philippines’ Bureau of Internal Revenue (BIR) before going all-in as a self-employed or mixed-income professional. Here’s a step-by-step guide on how to be recognized by BIR as a freelancer:
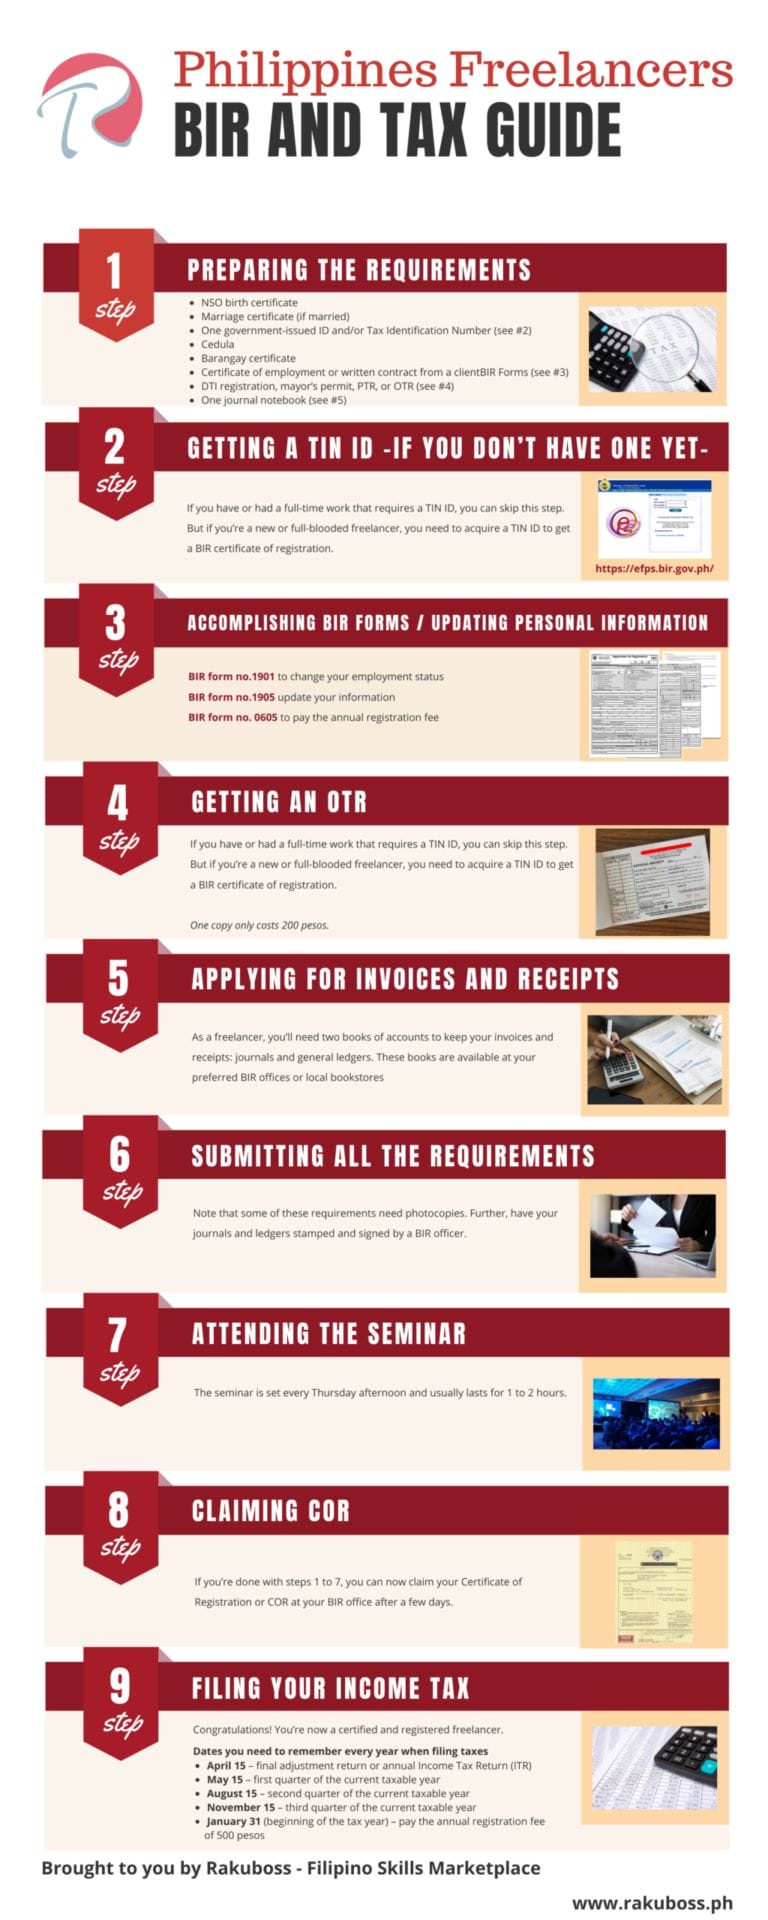
Checklist And Overview:
- Preparing The Initial Requirements
- Getting A Tin ID (If you don’t have one yet)
- Accomplishing BIR Forms / Updating Personal Information
- Getting An OTR
- Applying For Invoices And Receipts
- Submitting The Requirements
- Attending The Seminar
- Claiming COR
- Filing Your Income Tax
Become a Filipino Freelancer – visit Rakuboss.ph
Want to share this on you site? Just copy the code below!
<p><strong>BIR Registration Guide For Filipino Freelancers And Self-Employed Professionals</strong></p>
<p><img src='https://ed78h2zwnir.exactdn.com/wp-content/uploads/2019/12/Philippines-Complete-Guide-in-filing-BIR-Tax-For-Filipino-Freelancers-scaled.png'
alt='Philippines Complete Guide in filing BIR or Tax For Filipino Freelancers' width='540px' border='0' /></p>
#1 Preparing The Requirements
You’ll need to do some paperwork on top of your personal files and prior to the registration. As a Filipino citizen, you need to prepare the following requirements:
- NSO birth certificate
- Marriage certificate (if married)
- One government-issued ID and/or Tax Identification Number (see #2)
- Cedula
- Barangay certificate
- Certificate of employment or written contract from a client
- BIR Forms (see #3)
- DTI registration, mayor’s permit, PTR, or OTR (see #4)
- One journal notebook (see #5)
Note that these requirements are needed to get a TIN ID and acquire a BIR certificate of registration. You can disregard some requirements if you already have a TIN ID.
#2 Getting A Tin ID (If you don’t have one yet)
If you have or had a full-time work that requires a TIN ID, you can skip this step. But if you’re a new or full-blooded freelancer, you need to acquire a TIN ID to get a BIR certificate of registration.
You can register online via BIR eReg if you don’t want to visit the government office. Fill-up the form on the website, then submit. Wait for BIR’s response regarding your TIN registration through email. If approved, you can get the card at your preferred BIR office. Alternatively, you can visit the nearest BIR office in your location to register manually and finish the process within the day.
#3 Accomplishing BIR Forms / Updating Personal Information
Keep your TIN ID safe as we’ll need it throughout the process. For the third step, you need to acquire multiple BIR forms to start the registration process officially.
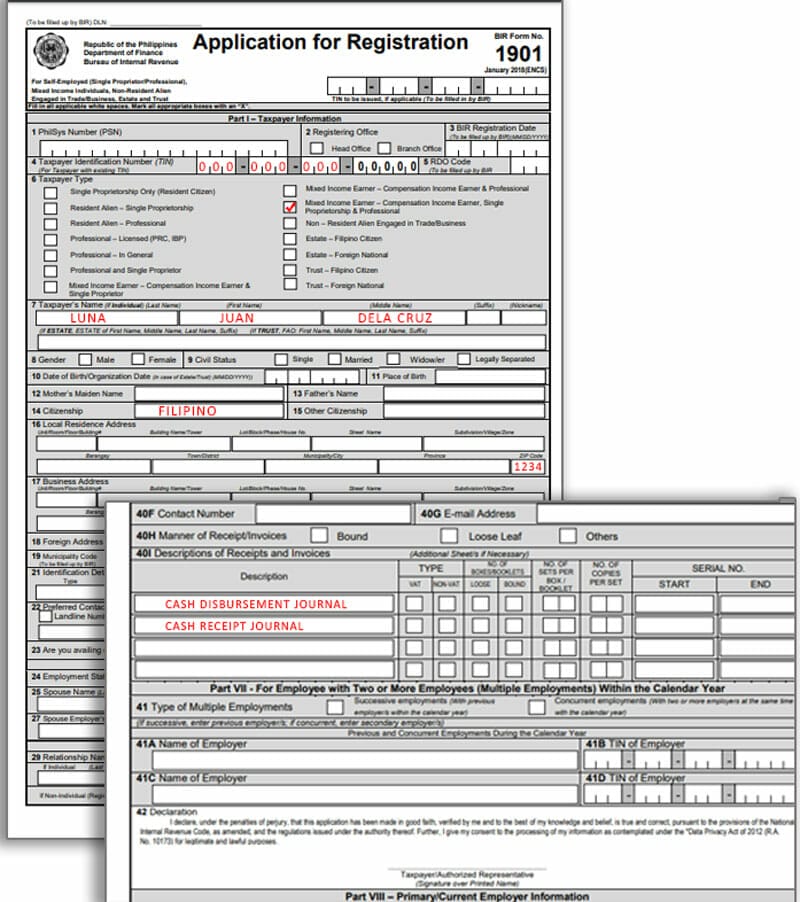
Using your TIN ID, you need to fill-up BIR form no.1901 to change your employment status from employed to self-employed or mixed-income earner. The latter means that you’re working full-time and freelancing at the same time.
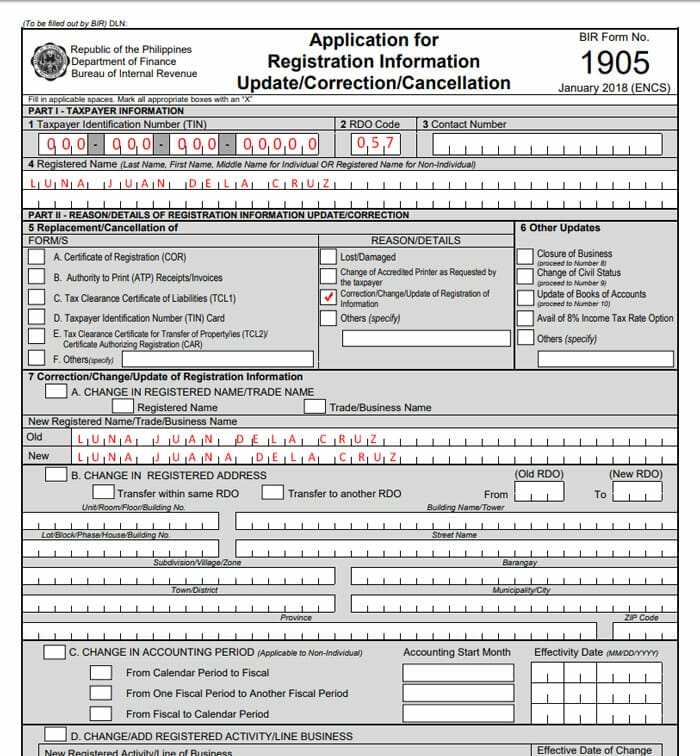
If you consider yourself as a self-employed individual, you still need to accomplish BIR form no.1905 to update your information, including your registered address and RDO location. The new information will reflect on your record after 5-7 working days.
To secure all your papers, you need to accomplish one more BIR form. Acquire and fill-up BIR form no. 0605 to pay the annual registration fee of 500 pesos for your Certificate of Registration (COR). You can go to BIR’s designated cashier or to any local banks authorized by BIR to pay the fee at your most convenient time. Always keep the receipts, you might need them later.
#4 Getting An OTR
Regardless if you’re a self-employed or mixed-income earner freelancer, you won’t need a DTI registration or mayor’s permit anymore. If you already have one, that’s an advantage. You can skip this step. If you don’t have any, BIR will require you to acquire a PTR (Professional Tax Receipt) or OTR (Occupational Tax Receipt) from your city or municipal hall. In a freelancer’s case, the best option is to get an OTR as PTRs are reserved for licensed individuals. What’s more, OTRs are much cheaper. One copy only costs 200 pesos.
#5 Applying For Invoices And Receipts
BIR requires invoices and receipts to help you keep tabs on cash disbursement and cash receipts. You’ll also be required to give official receipts to your clients, local or international. It’s bookkeeping 101. As a freelancer, you’ll need two books of accounts to keep your invoices and receipts: journals and general ledgers. These books are available at your preferred BIR offices or local bookstores.
#6 Submitting All The Requirements
Go back to #1 and prepare the checklist. You’ll need your personal files along with your BIR forms (1901, 1905, 0605), bank receipts, OTR, and book of accounts. Note that some of these requirements need photocopies. Further, have your journals and ledgers stamped and signed by a BIR officer.
#7 Attending The Seminar
Once your application is approved, BIR will inform you of the free Taxpayer’s seminar about filing taxes as a self-employed or mixed-earner freelancer. The seminar is set every Thursday afternoon and usually lasts for 1 to 2 hours. At press time, the seminar is not mandatory—courtesy of the current administration. However, it can give you a lot of insight about filing and calculating taxes.
#8 Claiming COR
You’re almost there! If you’re done with steps 1 to 7, you can now claim your Certificate of Registration or COR at your BIR office after a few days. Upon claiming, have the COR stamped for 15 pesos inside the office. This COR will serve as your official proof that you’re a credible and accredited freelancer.
#9 Filing Your Income Tax
Congratulations! You’re now a certified and registered freelancer. To maintain your status, file your income tax, and pay the annual registration fee regularly. Here are some of the important dates you need to remember every year when filing taxes:
- April 15 – final adjustment return or annual Income Tax Return (ITR)
- May 15 – first quarter of the current taxable year
- August 15 – second quarter of the current taxable year
- November 15 – third quarter of the current taxable year
- January 31 (beginning of the tax year) – pay the annual registration fee of 500 pesos